Monthly Archives: July 2007

Registering VB6 Office COM Add-ins as Per-Machine

9
Filed under Uncategorized

Office COM addins can be registered in one of two ways:

  • Per user
  • Per machine

Per User addins will be loaded for the user that the addin was registered to. This is the common situation with addins created in VB6. Typically, this means that whatever user was logged in when your addin was installed, is the ONLY user that it will be registered for.

It’s simple enough to run regsvr32 again on your addin dll while logged in as a different user to register it for the new user but this can really be a pain in a big IT shop.

Per user addins are registered under the HK_Current_Key hive in the registry. For instance, Word add ins can be found here:

HKEY_CURRENT_USER\Software\Microsoft\Office\Word\Addins

Other Office apps, namely Excel, PowerPoint and Outlook, store their addin entries in similar locations in the registry.

Per Machine addins, on the other hand, are registered in the same key, but in the HKEY_LOCAL_MACHINE hive, so, for instance, here:

HKEY_LOCAL_MACHINE\Software\Microsoft\Office\Word\Addins

Per Machine addins have the benefit of being registered once but loaded no matter what user is logged in. Definitely a bonus if you commonly have multiple users on a machine.

The problem is, VB6 automatically sets up the addin designer object such that it registers add ins as Per User addins.

This is pretty easy to fix, however.

Here’s a snippet from the very top of a DSR file for a Word addin (Open the file using notepad or some other text editor, NOT using VB6):

VERSION 5.00
Begin {AC0714F6-3D04-11D1-AE7D-00A0C90F26F4} WordAddIn
   ClientHeight    =   6465
   ClientLeft      =   4815
   ClientTop       =   1215
   ClientWidth     =   10020
   _ExtentX        =   17674
   _ExtentY        =   11404
   _Version        =   393216
   Description     =   “My Word COM Add In”
   DisplayName     =   “MyAddIn”
   AppName         =   “Microsoft Word”
   AppVer          =   “Microsoft Word 9.0”
   LoadName        =   “Startup”
   LoadBehavior    =   3
   RegLocation     =   “HKEY_CURRENT_USER\Software\Microsoft\Office\Word”
End

Note the RegLocation element.

Simply change that to HKEY_LOCAL_MACHINE (but leave the rest of the key alone), recompile and Presto! Your add in is now a Per Machine addin.

There’s only one snag with this, though. Every time you make a change to your DSR file, VB will automatically switch that entry back to HKEY_CURRENT_USER. Oh, the helpfulness.

But, never fear, there’s a solution here as well. Just never change the DSR<g>.

Seriously though. Simply create a separate class, expose some public methods on it that mirror the event signatures of those in the DSR file itself, and then pass the events on through the DSR to your new class.

That way, your DSR file never has to change, but you can change your class all you want and never have to worry about VB switching up the RegLocation on you.

For instance, in your DSR file, there will generally be an AddinInstance_OnConnection event that is fired when the host application is loading up your addin. Define it something like the following:

Dim rAddinClass as AddInClass
Private Sub AddinInstance_OnConnection(ByVal Application As Object, _
      ByVal ConnectMode As AddInDesignerObjects.ext_ConnectMode, _
      ByVal AddInInst As Object, custom() As Variant)

   'Create and Initialize a base class
   Set rAddinClass = New AddInClass
   rAddinClass.OnConnection Application, ConnectMode, AddInInst
End Sub

Then, in your AddInClass.cls file, define a function like

Public Sub OnConnection(ByVal Application As Object, _
      ByVal ConnectMode As AddInDesignerObjects.ext_ConnectMode, _
      ByVal AddInInst As Object, custom() As Variant)

   'Do Whatever you need to do during the OnConnection event here
End Sub

When the host app (could be Outlook, Word, Excel, or PowerPoint, they all work the same), loads your addin, it will fire the OnConnection event. The sub in your DSR file will get called, which will then call the corresponding sub in your Addin Class and you can do whatever coding you need to do, never having to change the DSR file again.

Or you can try to write addins in VB.NET using VSTO, suck up about 10x the diskspace and memory, and have to deal with things like COM shims, and other splinters of joy.

Star Wars at the Museum

0
Filed under Uncategorized

image

Checked out a very cool exhibit yesterday.

The Ft Worth Museum of Science and History is presenting “Star Wars: Where Science Meets Imagination” till Sept 3.

It’s got plenty of interactive stuff for the kids (that most likely won’t have any idea what Mos Isley, a Jawa Transporter, or a Rebel Blockade Runner is).

Plus, it’s got stuff from Mos Isley, the actual Jawa Transporter (model), and the original Rebel Blockade Runner (model). Can’t get much better? Oh, but it can.

How about the original, 70lb model of the Millennium Falcon, the original Landspeeder (that looks ultra-cheesy up close!), and the first Vader costume, plus quite a bit more.

I’m sure it’s touring, but I couldn’t find out any info on other museums it’ll travel to next, so be on the lookout in your area. 

Good stuff.

image

Showing your ICQ status on a web page

2
Filed under Uncategorized

First, the disclaimer, I’m doing all this in ASP.NET 2.0 with VS 2005. If you’re using plain old ASP, or VS 2003, it may or may not work.

To begin, you’ll need to add an IMG tag somewhere on your page (or, in the case of dasBlog, somewhere in the homeTemplate.blogtemplate file that’s part of the theme you wish to use. Note: If you allow users to change the theme in dasBlog, then you’ll need to add this IMG tag to all themes you’d like it to be part of. For this blog, I disabled the switching of themes, so I only had to add this tag to one file.

<img src="./themes/[your theme name]/IMStatusImageProxy.aspx?type=ICQ"
title="Tooltip your want to display" >

Where [your theme name] is just that. This just allows you to put the  IMStatusImageProxy.aspx file in your theme path. If you prefer, you could copy it to the dasBlog root path and just reference it there.

This tag causes the browser to go and load the IMStatusImageProxy.aspx page for the image to use when it needs to obtain the image for the IMG tag. Now, that ASPX page isn’t actually  an image at all, but the browser doesn’t care at this point.

Next, create the IMStatusImageProxy.ASPX page. You’ll need to put it in your theme’s folder (or in the dasBlog root as I mentioned above).

<%@ Page Language="VB" %>
<script runat="server">
' ------------------------------------------------------------------------------------------
' IMStatusImageProxy.asp
'
' Used to retrieve the content of the status image from 
' websites that serve them up.
' I don't believe there's a way to avoid the proxy page
' when pulling the images. At least not and remain easily compatible with
' dasBlog.
' The original idea is from Dino Esposito.
' ------------------------------------------------------------------------------------------
   Private Function pGetWebPageImage(ByVal URL As String) As Byte()
      '---- Create the HttpWebRequest object
      Dim req As System.Net.HttpWebRequest = System.Net.WebRequest.Create(URL)
      Dim Results As Byte()

      Try
         '---- Get the data as an HttpWebResponse object
         Dim resp As System.Net.HttpWebResponse = req.GetResponse()

         '---- Convert the data into a string (assumes that you are requesting text)
         Dim br As New System.IO.BinaryReader(resp.GetResponseStream())
         Results = br.ReadBytes(50000)
         br.Close()

      Catch ex As System.Net.WebException
         'Something went awry in the HTTP request!
         ReDim Results(0)       End Try       Return Results    End Function    Public Sub Page_Load()         '---- Retrieve the TYPE of IM system whose status         '     is being requested         Dim IMType As String = Ucase(Request.QueryString("type"))
        Dim ImgType as String = "image/gif"
        Dim r() as Byte         '---- set up the response object
        Response.Expires = 0         Response.Buffer = True         Response.Clear()         '---- Filter for the good arg values         '     we don't want to allow just any old parm value in         Select Case IMType             Case "ICQ"                '---- handle ICQ status                '     ICQ makes this relatively easy because they have a service to                '     retrieve that info                '     Retrieves a GIF type image                r = pGetWebPageImage("http://status.icq.com/online.gif?icq=[YOURICQNUM]&img=16")                            'Case "AIM"                '---- handle AIM status here                            'Case "HOTMAIL"                '---- handle AIM status here                            Case Else                '---- not a valid IM type so bail out                Response.End()                Exit sub         End Select         '---- set the image info saved from the main page         '     into the response object         Response.ContentType = ImgType         Response.BinaryWrite(r)         '---- since this is a proxy, end the response now         Response.End()     End Sub </script>

You’ll obviously want to replace [YOURICQNUM] with you’re own ICQ number. However, since your ICQ number is in the code portion of the ASPX page, it won’t be visible in any way to the web browser, and hence, the public.

Also, the &img=16 is a parameter that indicates to the ICQ webservice which imageset you’d like to use. You might want to experiment with different numbers, from 1 on up. 16 looked pretty good to me.

Essentially, the idea of this proxy page is to:

  1. Retrieve the IM type you’re wanting status for. In this case, I’m only supporting ICQ right now.
  2. Clear out the response buffer and make sure it can’t get cached (because the status could change from one page refresh to the next).
  3. Retrieve the web page image via the web service in whatever manner is appropriate. The image comes back in a BYTE() array.
  4. Set the ContentType of the response appropriately (this tells the browser that what’s coming back is a binary GIF image)
  5. and finally write the contents of the BYTE array that was retrieved earlier.

I thought this approach was quite nice for several reasons

  • It doesn’t require creating a MACRO for dasBlog. That’s not hard to do, but if you don’t have to…
  • It doesn’t require inline code in the dasBlog theme template. From what I can tell, dasBlog doesn’t support inline code in templates anyway. If I’m wrong about that, please let me know!
  • What is required in the theme template is spectacularly easy to deal with (one IMG tag).
  • It shows your status without revealing your ICQ number, which is appealing for a variety of reasons.
  • All the required code is completely encapsulated in the IMStatusImageProxy.ASPX page.
  • Finally, you should be able to stick this page into any ASP.NET 2.0 based site and get the functionality. It doesn’t require dasBlog at all or any other 3’rd party stuff.

Let me know what you think!

ICQ Status Indicator is Online

0
Filed under Uncategorized

I’ve been playing with this idea for a while. Basically I’ve been looking for a nice simple way to add an IM status indicator to this web page. That way, visitors would be able to see if I’m actually around to chat.

But I had a couple caveats.

  1. I didn’t want to make my ICQ number publicly available on my site (IM spam is just too god-awful to think about)
  2. It had to work with ASP.NET 2.0 and dasBlog.

I’m happy to say I think I came up with something that might actually work, though I’m still testing it.

I’d love to show status for all the major IM systems (I’m on Google Talk, Yahoo, MSN, ICQ, and AIM), but ICQ seems to be the easiest to get up and running, so I’ll stick it with for the time being.

If you’d like to get my ICQ number, just email me. There’s a little email button right above the ICQ status indicator (it’s the envelope icon in the upper right). That button now actually works, too, which is new. It’ll display a form for sending me an email (that way, my email address isn’t exposed on the page, either).

And, once I clean it up a bit, I’ll blog the actual ASP code that makes the ICQ status indicator possible.

Vista Explorer “Helpfulness”

3
Filed under Tweaks, Vista

Working with Vista, I’ve noticed that it tries to be a tad too helpful sometimes. I’ve already posted about it’s proclivity for attempting to AutoTune my network card and in the process, detuning it.

There’s a reason Bob failed, and a reason those annoying “Office assistants” got dumped first thing after installing Office. I suppose I should be thankful there’s no 3D animated wizard bouncing out of the sidebar from time to time to “wave it’s wand” on a window of mine to move it to the monitor that would be “more appropriate”, or whatever.

One annoyance I’ve run into is that Vista tends to just “decide” that I want a particular folder to show in grouped view, or in thumbnail view, even though I’ve gone through the process of turning all that crap off and setting ALL FOLDERS to view in Details mode.

Grrr.

Well, I was just browsing for something completely unrelated and happened upon this posting by MVP Keith Miller about turning off the autodetect view in Explorer.

In it, he describes a reg hack that’ll do just that, turn that feature off.

Here’s the script (you’ll need to save it to a REG file and Right click and select MERGE)

Windows Registry Editor Version 5.00

[HKEY_CURRENT_USER\Software\Classes\Local Settings\Software\Microsoft\Windows\Shell\Bags\All Folders\Shell]
“FolderType”=”NotSpecified”

Before you run it though. Load up RegEdit and check out that Bags key:

[HKEY_CURRENT_USER\Software\Classes\Local Settings\Software\Microsoft\Windows\Shell\Bags

If your system is anything like mine, there will be literally HUNDREDS of entries in there.

Make sure you turn off “Remember Each folders settings”, and then Delete the whole Bags key to remove all those “memorized” folder settings you didn’t want to memorize in the first place. No wonder the damn registry balloons faster than Steve Fossett in a hurricane.

image

HP G85 All in one Printer under Vista, and Word 2007 Slowness

1
Filed under Uncategorized

I picked up an HP G85 ages ago, and it’s been a bulletproof printer ever since. Print quality is still excellent, scanning is top notch, and it has very good fax support. There’s newer stuff out there, but damn, I spent close to 800$ on this thing when it was new, so I’m a bit attached to it.

I hooked it up to a JetDirect 170x to turn it into a networked printer, which works great because it’s a bit large to put in the server closet with all my other equipment, and faxing would be a pain.

So I was more than a little bummed to discover that although Vista ships with HP G85 drivers, it DOESN’T have any support for the JetDirect box. I tried all sorts of things to get it to work, even creating my own Port definition. No joy.

I eventually installed the drivers to my server and then shared the printer there. At that point, I could create a new printer on my workstation and just point it to the shared server printer. That worked and I thought I was home free.

However, I started noticing some very peculiar behavior in Word 2007. I’d start it, and after a few seconds, it would display “Connecting to Printer” in the lower left corner of the status bar.

Often, though, Word would just hang for a minute or more as it loaded the document.

What’s worse, invoking Word through it’s COM Objects and loading a document would also take forever.

Bad news.

I suspect it’s not necessarily a problem with Word 2007, though it could be. I recently stumbled across this post by Mark Russinovish (one of the SysInternals guys) that details some spelunking he did to determine why File Open dialogs could end up being so slow under Vista. Turns out, Vista tries, maybe a little too hard, to be all user cuddly/cozy. We have ultra-mega-giga hertz machines and can’t display a freakin’ file open dialog any faster that DOS 6.2 programs running under Netware back in the late 80’s.

Anyway, I deleted the printer definition pointing to my shared server printer and all was back to normal.

But I couldn’t print.

Then, I stumbled onto the HP Install Network Printer Wizard on the HP site. I can’t tell how fresh it is, but it’s gotta be pretty recent because I went looking for just this sort of thing not a month or two ago.

Anyway, it works a treat, except that I can only PRINT to the G85 this way (the scanning and faxing support isn’t there, and they even warn that it’s not).

So, we’re back and printing, and it doesn’t hang Word up anymore.

I’ll just call the IT guy in to take care of the scanning…. Oh, right. I telecommute<sigh>.

Captchas Back On

2
Filed under Uncategorized

Sigh. Too many spam comments are coming in, so I had to turn Captchas back on.

For those that don’t know, Captcha’s are the little “enter the funky characters from the picture” at the bottom of the comment screen when you want to leave a comment. It’s basically just a way to keep spam bots from being able to automatically post comments to messages.

Unfortunately, I’m getting too many scum-sucking, dregs-of-the-earth types posting BS comment spam to leave comments open anymore.

Where’s a handy pool full of hungry piranha when you need them?

Network Autotuning and Vista

2
Filed under Troubleshooting, Utilities

I’ve noticed over that past few weeks of running Vista that certain things tend to be A LOT slower now, even given the fact that I recently picked up a gigabit network card for my server, and a gigabit switch, so I could make use of the built-in gigabit network adapter on my new workstation motherboard.

For instance, I use a program called VBLiner to line number all my VB source right before I compile it. The line numbering process itself is very fast, but the program would pause, noticeably, for each file it opened. It was almost as if the process of locating and opening the file was slow, but actually reading it was very fast.

Today, it finally got to be too much, so I had to start digging.

Come to find out, Vista has this nifty new thing called “Network Autotuning” that, apparently, doesn’t work particularly well.

You can see it yourself by opening a DOS box (with Admin priviledges), and entering

NETSH INTERFACE TCP SHOW GLOBAL

You should end up seeing something like this:

image

That “normal” is the problem.

Execute this to turn off autotuning:

NETSH INTERFACE TCP SET GLOBAL AUTOTUNINGLEVEL=disabled

turn it back on with

NETSH INTERFACE TCP SET GLOBAL AUTOTUNINGLEVEL=normal

and, apparently, using this will sometimes work, too, though I’m a bit hesitant to bother at this point.

NETSH INTERFACE TCP SET GLOBAL AUTOTUNINGLEVEL=HIGH

Nothing like a built-in network performance de-tuner.  It’s STRESS.EXE but without all the hassles of actually having to run a utility. Grrr.

Titans of Grammar

2
Filed under Uncategorized

I’ve been known to make a few spelling mistakes in code (retrieve vs retreive caused me no end of pain at one point, long, long ago), and any programmer knows that it can sometimes be tricky to get the grammar right for a particular dialog, especially when a checked checkbox causes something to not happen<g>. I usually set up a special priority (1000 in a 1-10 system) for spelling and grammar mistake bugs in whatever bug tracking system I’m using, because, let’s face, it, few bugs are more embarrassing, both for the programmer and the company, and fewer still can be located and fixed as easily.

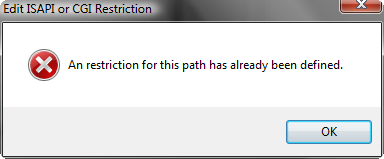
But this one surprised me. It’s in the IIS7 management console.

Bad Grammar

Ah, good to see that even billions of dollars in liquid capital can’t solve this problem.

Digital Signatures in Word 2007 Templates

2
Filed under Office

Encryption is an unbelievably complicated topic and I’m only now beginning to get comfortable with digital signatures in Office documents.

The Good News is that in Office 2007, other than the fact that the menu locations for checking signatures has changed, most everything about digital signatures has remained the same as in Office 2003, and, from what I can tell, things are compatible all the way back to Office 2000.

The Bad News is that it’s still complicated as hell to deal with digital signatures.

I’ll try to cover a few of the bigger bits I’ve come up against while digging through digital signatures in Office (and in particular, in Word).

Signing a DOT file

The first thing you must do when getting ready to sign a template is to manually enable timestamping. Ok, technically, you don’t have to do this, but if you don’t timestamp the signature, when the certificate used to sign the template expires, so will the signature, and poof, your template will no longer be signed. Depending on how the user’s Word Is configured, that may mean that your template now fails to load.

You enable timestamping by adding a few entries to the registry. Office doesn’t provide a way to do this via the UI (even in 2007), so it’s all regedit (or run the REG script below).

Windows Registry Editor Version 5.00
[HKEY_CURRENT_USER\Software\Microsoft\VBA\Security]
“TimeStampURL”=”http://timestamp.verisign.com/scripts/timstamp.dll
“TimeStampRetryCount”=dword:00000005
“TimeStampRetryDelay”=dword:00000005

Once you’ve turned timestamping on, you need to verify that you have a digital certificate loaded that can be used to sign templates.

Click the Start button and RUN, enter MMC and press Enter. This should bring up an empty Management Console.

image

Click FILE, Add/Remove Snap-in and find the Certificates snap in, then load it up.

When it asks for what type of certificates to manage, select the computer account.

image

Next, it should ask about managing the local computer account or a remote computer account. You’ll normally want to only deal with the Local Computer.

Once you get the certificate manager loaded, expand the personal certificates. Generally speaking, this is where certificates purchased through online vendors (like Verisign) will end up when you download them.

image

Now, right click the certificate and choose Properties.

image

You should see code signing in the box as shown. I’m not an expert on the different types of certificates, so it may be possible to sign documents WITHOUT a code signing certificate. Best to talk with someone at your vendor for details on that. One definite benefit of a code signing cert is that you can use it to sign DLLs, and EXEs, as well as templates.

Anyway, at this point, you can be pretty sure the cert is appropriate for signing templates.

One final note: It is often a good idea to export the signature so you can use it via the command line etc. The PFX (Personal Information Exchange) file format is good for this, because it contains both the public and private keys for the certificate. The bad news is you want to protect the PFX file as much as possible, because if someone obtains it and the password used to create it, they would be able to sign documents as if they were you.

You can export to a PFX file by right clicking the certificate entry (in the middle list), selecting All Tasks, then Export.
Indicate that you want to export the private key (which will require a password), and then make sure you select the PFX output option.

Verifying the Signature

Verifying that you actually got the Digital Signature correct is one of the more frustrating parts of working with digital signatures in Office.

You’d think you’d be able to verify the signature via the Tools/Digital Signatures menu in the VBA editor screen:

image

image

image

image

If you get this far, you know that the signature was signed. You can check the valid dates on the certificate as well.

However, this screen does NOT show the date the signature was timestamped and that, unfortunately, is a key piece of information you need to verify the signature. In fact, although this screen purports to be showing the digital signature, this is really just information on the certificate used to create the signature.

Verifying the TimeStamp

To actually get information about the signature, and specifically the timestamp, you have to jump through a few hoops.
First, make sure that the template IS NOT in any of the autoload places (most commonly the Word STARTUP folder or the Excel XLSTART folder).

Next, make sure that security is set such that unsigned templates won’t automatically load without prompting.

image

image

image

Once you’ve done that, if you put the signed template, say, on the desktop and load it by holding down the SHIFT key, right clicking, and selecting OPEN, you should get the message bar indicating that there are security warnings.

image

Click the Options button and you should get a Security Alerts Window:

image

Click the Show Signature Details link to see the actual details of the signature itself:

image

Notice the title of this dialog is actually “Digital Signature Details”, not “Certificate Details”. And the Signing Time is indicated here, showing that, in fact, this digital signature was timestamped.

One final note. The Office 2007 and 2003 object model (and XP, but not Office 2000), contains properties for enumerating and retrieving information on document and template signatures. Specifically, the DOCUMENT object now sports a SignatureSet property, which is a collection of signatures on the document. From there, you can navigate through the object model to retrieve all the signatures on the document, as well as details (including the signing time) of those signatures.

However, there are significant differences between the models in 2007 vs 2003, so any code written to utilize those objects would need to accommodate those differences.

The above steps work similarly in all versions of Office from 2000 to 2007. I’ll try to capture screenshots of the process in Word 2000 at some point, to illustrate the differences.

Related links

Office 2000 Macro Security