Category Archives: Hack of the Day

Viewing CHM files from Network Drives

1
Filed under Hack of the Day, Troubleshooting

Ok. So this is not a particularly new problem. You get an application, which comes with a help file in the CHM (Compressed Hypertext) format. Works great as long as you don’t try and open it from a networked drive. <sigh>

So, what to do?

Well, Microsoft has a pretty complete suggestion here.

But, it’s registry hacks, it’s not pretty, and, it didn’t work for me on a  Win7 system.

The Help and Manual folks put together a pretty interesting alternative here but this is assuming you’ve got a product you’re installing. Not great for a typical user.

A simpler way

After researching this way more than I should have, I ended up with a simple straightforward solution that works reasonably well.

Just zip the CHM file into a zip file in the same location.

Yes that’s it!

image

Notice in the image that I have zipped the 7Zip CHM file into a zip file. I renamed the file as 7-zip.chm.zip, just to remind me that it contains the CHM file.

To read the file, just double click the ZIP file, which, in modern Explorer windows, will open the ZIP directly, then double click the CHM inside the ZIP itself.

When you do that, Explorer will decompress the CHM file to your temp folder and then open THAT file with the CHM viewer. Because that CHM file is located on your local harddrive, the restrictions in place that prevent viewing networked CHM files, won’t take effect and, presto! CHM viewage without any registry hassles.


By the way, the 7Zip command line version is an excellent tool (with a great help file<g>) for doing just this sort of thing, if you happen to like command line tools.

Grab it here.

Converting a 4:3 screen into a 16:9 widescreen

7
Filed under Hack of the Day, Media

Some time ago, I picked up a Draper motorized projection screen off CraigsList. The price was right, the size was good (70″ width, 80″ diagonal 16:9 ratio), the screen was in decent shape (the very bottom was a bit warped, probably from being stored on its side, grrr), and it was motorized, so I could retract it when I wanted the living room to look like a living room.

Several months later, I found a projector and finally mounted the screen. We’ve been really enjoying it ever since.

But one thing kept bugging me. The screen was originally used for presentations in a lecture hall at Texas A&M, so it was a 4:3 ratio screen. Actually, the reflective screen material wasn’t masked at all on the top and bottom, and the screen itself is so long, I’m not exactly sure how tall it is!

Since the very bottom 6″ or so was warped, I’d just set the projector image to just above the bottom of the screen, and, for a 16:9 picture, it ended up about 39″ tall, leaving lots of white screen above the picture as well.

A relative, who’s a tad more into home theater than me, had once commented that having the screen black-masked on all 4 sides can dramatically improve the perceived picture quality, because of the increased contrast between the background and the image itself. I’d kind of doubted that until I saw his setup. Big difference!

But, I had a problem. How to black-mask the top and bottom of a vinyl projection screen that’s a good 8′ across and weighs a ton, without completely ruining it?

I toyed with several ideas, including constructing a black-velvet drape set (to mask the screen without doing anything at all to it), and rolling a second, black, layer of vinyl, up onto the drum, among others.

I ended up deciding that the best approach was likely just to spray paint the screen black.

But how, and with what?

I called Draper and talked with a very cooperative sales rep that knew exactly what I was wanting to do and understood why. Unfortunately, he said, they don’t sell the paint they use to mask the screen, and even if they did, he said, they apply it when the material is off the drum, via something akin to printing press rollers.

imageLong story short, I found Dupli-Color Vinyl and Fabric Coating (it’s not paint, apparently), at the local Pep-Boys auto parts shop for $6.49. A test spray on the back of the screen proved it wouldn’t melt the thin vinyl (a really BIG concern for me!). Plus, since it’s designed for vinyl, it remains flexible and won’t crack up when I roll the screen up and down like a normal paint would. But now the problem was how to mask it off.

I tried masking tape but it was so sticky, when I pulled it off, it puckered the screen material where it was stuck. You can still see the effect even now. That wasn’t going to work.

A trip to Home Depot and I had several varieties of low tack painter’s tape, but, alas, all were far too sticky as well.

imageSeveral months passed and I was in a FedEx Kinko’s when I came across this.  That’s right, PostIt notes as a tape! Who knew? I picked up a roll and sure enough, it had just enough tack to stick, but not enough to mess up the screen when I pulled it off.

A few hours of masking and spraying later, and I ended up here (the screen is set far lower than normal so I could mask out the very top portion, normally it’s raised about a foot and a half):

IMG_0237

Be sure to mask everything and open windows because the spray goes everywhere and the fumes are terrible.

Also, at least for this particular screen, once I’d sprayed the top portion, it started to wrinkle, bad. I thought I may have actually damaged the screen, but there wasn’t much else to do so I just waited. It took about an hour, but eventually, the wrinkles stretched taut again and screen looks great.

Because of the popularity of the widescreen 16:9 format now, it’s pretty easy to come across older, 4:3 ratio screens with very attractive prices. Using a few cans of paint, and some careful masking, it’s pretty easy to end up with a nice 16:9 screen for a fraction of the cost of a new one.

And the picture?

The improvement was definitely worth the effort!

Hack of the Day: Swapping Lines of a 2-line Phone Connection

1
Filed under Hack of the Day, Hardware, Phones

Do you have two phone lines, but you want your modem to use line 2 when it only sees line 1? Or maybe you have a single line phone that you want to use on line 2.

You could go down to Radio Shack and pick up a 2 line phone. Or you could pick up a 2 line phone switch (that lets you switch between line 1 and 2), or even this 2-Line, 3-Way Adapter Jack.

But, that costs money, and if you’ve got a few minutes and a spare phone extension cord, you can probably rewire one in less time than it’d take to run to the store.

First, some background…

Like many people, I have two phone lines into my house, one specifically for my home office, the other, the family phone number.

If you’ve never looked before, a single phone line actually consists of a pair of wires, typically colored RED and GREEN.

If you have two phone lines in your house, (and usually even if you only have one active phone line, you’ll have wiring for two lines), the second line will consist of two wires colored BLACK and YELLOW.

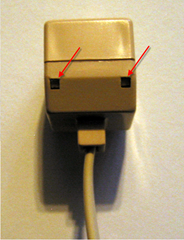
From the front, the plug will usually look like this (note the 4 wire prongs inside the connector socket, the picture’s not great…)

image

But from the back, they’ll usually look like this (note: this is a 2 connector plug, so you can actually plug two phones in simultaneously). Here, you can easily see the RED/GREEN, BLACK/YELLOW pairings.

image

A normal phone will have contacts only for the RED/GREEN wire pair, which means you can only use it with line 1.

BUT, if you simply swap the RED/GREEN and the BLACK/YELLOW pairs, that single line phone can then be used on line 2.

This is trivially easy to do if you have a 2 plug wallplate like the above. In fact, on the wallplate above, the bottom plug has its wires cross-connected to the terminals on the top plug. For instance, note that the GREEN wire from the bottom plug is connected to the terminal with the YELLOW wire on the top plug. The same goes with the RED->BLACK connection, etc.

Then, when you’re ready to wire this back onto the wall, simply connect the RED/GREEN/BLACK/YELLOW wires from the wall to their original terminals on the top plug. You can now plug a single line phone in the TOP plug to connect to line1 or into the bottom plug to connect to line2.

But what if you don’t have this sort of wallplate lying around?

I happened to also have an 2 plug extension cord, the end of which looks like this:

image 

It has all 4 wires on both plugs, so again, the trick is to swap out the wire pairs on one plug, so that one plug is Line2/Line1 and the other is the normal Line1/Line2.

Mine had little tabs that you press in gently to release the two halves of the shell (be careful not to break them off):

image

Open it up, and pull the wire blocks back from the front half of the shell to look something like this:

image

One at a time, gently bend the loose wire prongs forward enough so they can be pushed back through the plastic block, push them through, and swap them with the appropriate other colored wire.

  • BLACK<–>RED
  • YELLOW<–>GREEN

These are thin wires so they bend easily,but they can break off easily too!

Do only one pair at a time to keep from mixing them up.

Also, you only need to swap pairs on ONE of the blocks, just leave the other as is so you can still access line 1 as line 1.

Once you have the wires in their new positions, gently bend the wire prongs back over like they were originally, put the blocks back in the front half of the shell, seat them solidly and then snap the shell halves back together.

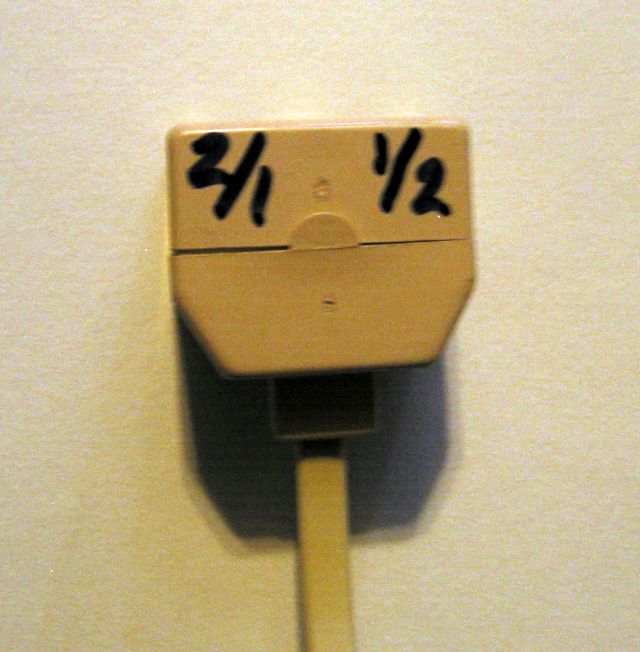
Now label the plugs as to which is which:

image

To test, plug a single line phone into the unmodified plug and dial your line 1 number. If it’s busy, you’ll know it’s line 1. If you’ve got phone company voicemail, well, I’ll leave it as an exercise to the reader to determine which line you’re listening to<g>.

Then, do the same for the other plug and you should be calling out on line 2.

Personally, I like modifying the extension cord better, because it’s easier to remove and take it with you or move it about the house if necessary.

Now, why bother with any of this anyway?

Well, I happen to need to constantly connect to web session conference calls (usually via GOTO Meeting), and dialing the phone number, plus the conference access code, was beginning to be a grind.

So, I wrote a little VB.NET utility that monitors the clipboard for specific regular expressions (i.e. a phone number, GOTO Meeting ID or URL, etc) and can then dial the number through the modem and launch the URL all at one pop.

But I needed it to dial out on Line 2 (my office line) and, of course, the modem only sees Line 1.

I’ll be blogging about the utility itself soon, so stay tuned!