Category Archives: SQL

10
Filed under .NET, SQL, Visual Studio

Command Line MSSQL

SQL on the command line!

There’s a number of tools out there for connecting to an MSSQL Database and running queries from the command line, but a colleague recently pointed out a new one I hadn’t seen before that actually works really really well, especially with Windows Terminal and Cmder.

First, make sure you’ve got Windows Terminal and Cmder installed. They are truly the bees knees when it comes to working in the command line under Windows!

Next, install mssql-cli. This app is actually a python script, so you’ll also need Python if you don’t already have it installed. Don’t fret, though. The link contains instructions on getting Python going, and once that’s done, installing mssql-cli is a single pip command:

python -m pip install mssql-cli

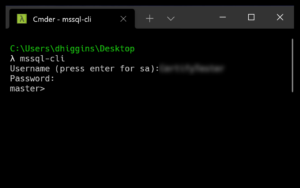
To test it, just open a command prompt and type:

mssql-cli

Now, that alone is nice, but if you’re like me, you have several test databases you connect to on a regular basis and entering credentials is troublesome at best.

Not to worry. There’s a batch file for that!

Now, it’s not the simplest in the world even though it is a single liner. So here goes:

wt -d c:\users\dhiggins\desktop cmd /k "c:\apps\cmdr\vendor\init.bat cd %CD% && mssql-cli -U {dbloginusername} -P {password} -d {dbname} -S {dbservername}"

Let’s break that down:

  • wt – starts Windows Terminal
  • -d – followed by the folder you’d like to start terminal in. Not strictly required, but it’s a nice add. I just set it to my desktop
  • cmd – This is used to get Cmder started in a tab in Windows Terminal
  • /k – tells cmd to execute the following quoted command and stay loaded
  • “c:/apps/cmdr/vendor/init.bat – this get Cmder started and the shell all initialized. Note that the path to your installed copy of Cmdr may be different from the “apps/cmdr” that I have here.
  • cd %CD% – Gets Cmder switched to the folder that this bat file is located in
  • && mssql-cli – Actually starts mssql-cli! The whole point of this exercise.
  • -U {dbloginusername} – Provider the UserName you use to log into your db server here
  • -P {password} – provide the database user password here
  • -d {dbname} – provide the database name here
  • -S {dbservername}” – And finally provide the database server name here. I’m just connecting up to the locally installed instance of SQL Server.

Save that as a BAT file and dblclick it to launch directly into a Cmder tab inside Windows Terminal connected to the DB of your choice. Perfection!

One big benefit from using Cmder, at least from what I can tell, is that it automatically supports horizontal scrolling of query result sets.

Notice that those right pointing arrows!

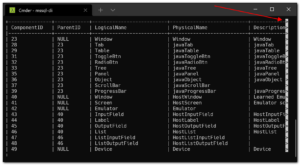
Just use <left><right> arrow keys to scroll the grid left and right as you page through results.

If you don’t use Cmder as your shell, scrolling won’t work like that unless you install something else called PyPager. Which I didn’t do.

Visual Studio Bonus!

Now, all this is well and good, but as they say on late, late night TV: Wait! There’s more!

I spend a lot of time in Visual Studio, so any way to stay there tends to be a positive for me, and one of the most recent additions to VS is built-in Terminal support.

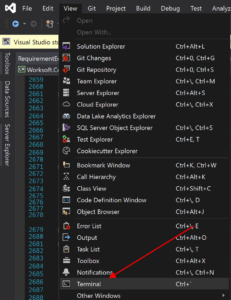
Works a treat and even works with Cmder, so you get all that great Cmder goodness right inside Visual Studio.

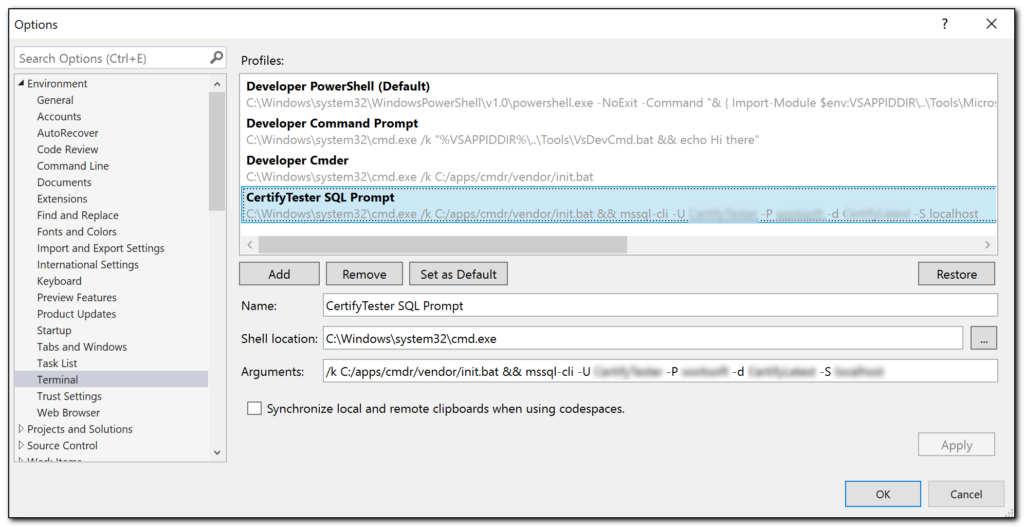
But, you can create as many “Terminal Configurations” as you want, so here’s a shot of a few that I have, including one running Cmder directly and another starting the MSSQL-CLI directly to a specific database.

Easy and quick direct access to a specific db, Right inside VS!

Fun With SQL (OVER and PARTITION clauses)

0
Filed under Hiring, SQL

I’ve been interviewing over the last few weeks for a new position (If anyone has a need for a very experienced .Net developer with some recent Ruby/Rails/Javascript/Coffeescript/JQuery etc chops, shoot me an email!)

At any rate, one company had an interesting SQL challenge.

In a nutshell, given a table with an ID field and a FLAG bit field, find all the consecutive rows where the FLAG field is 1 (ie a bad record).

The trick was that the output needed to look like:

ID RANGE        Error Count
4000-6000       2001

First, lets insert a CSV file into a table….

BULK INSERT Flags
FROM 'c:\dev\darin\sqltest\sqltest.csv'
WITH
(
FIELDTERMINATOR = ',',
ROWTERMINATOR = '\n',
FIRSTROW = 2
)
GO

They supplied a 1.6 million row sample table, and expected sub 10 second response time. Sooooo, you also might want to add a clustered index to the ID field.

Let’s see some SQL!

With the sample table in place, I could get down to business.

I’ll admit, I had to google the syntax of the OVER and PARTITION clauses in T-SQL. They’re not something I use every day.

First, I needed all the rows, with a group number grouping all the consecutive rows who’s flag value was 1. I used a Common Table Expression for this. I could have used temp tables and it would have resulted in about the same performance, but… what the hey!

WITH parts AS (
   SELECT *, id - ROW_NUMBER() OVER (ORDER BY id) AS grp
   FROM flags
   WHERE flag = 1
)

Next, I needed the count of each group as part of the result set….

WITH counts AS (
   SELECT *, COUNT(*) OVER (PARTITION BY grp) AS cnt
   FROM parts
)

With those two CTEs in place, all that was left was the output Select….

SELECT cast(min(id) as varchar(20)) + '-' + cast(max(id) as varchar(20)) as IDRange, 
   cnt as ErrorCount
FROM counts
WHERE cnt >= 1000
GROUP BY grp, cnt
ORDER BY IDRange

In this case, I only cared about blocks of errors of more than 1000 rows. The concatenated SELECT is just to make a nice output format. realistically, I’d probably only select MIN(ID), MAX(ID), CNT

I haven’t used CTE’s a lot, but I’m finding more and more uses for them.

And the OVER clause is something I really need to get more familiar with.

For the 1.6 million row source table, I was getting sub 2 second response times on this query. No doubt, there’s ways to speed this up, but that’s not too shabby.

Strange Behavior With SQL and Group By

1
Filed under SQL, Troubleshooting

imageI’ve been finishing out a rules engine over the last few weeks for a local law firm. Lots of very complex stored procs, tons of tables.

Anyway, in processing several test batches of records, I started noticing that jobs would “hang”. I left the process going for hours, and it never released.

Now, normally, I’d go straight for the deadlock detection stuff, but my rules engine (that invokes all the various rules necessary for the processing) already has error handling code setup to deal with deadlocks. This is because the processes are so complex, and will be running on multiple threads against the server simultaneously, so deadlocks are just about unavoidable to an extent.

But, in this case, I wasn’t getting deadlocks.

Alright then, had to be blocking. But firing up Activity Monitor, plus all the usual stored procs for evaluating blocking showed nothing. The Job was definitely running, though, as reported by the SQL Agent monitor.

Even more puzzling was if I forcibly stopped the errant job, my rules engine would kick in (as it’s supposed to), rerun the failed job, and it’d run right through, no delays at all.

And finally, the real kicker. I could reset the process, run the exact same set or records through the process, and sometimes a job would hang, other times, it’d run through perfectly fine.

Ah, random bugs!

The TSQL

After adding some logging, I was able to narrow down the hang to a specific TSQL query within a particular stored proc.

Granted, this is summarized somewhat from the full query, but basically, it looked like this:

select
    def.ClientID,
    def.Defendant,
    PlayerID=MIN(pl.ID)
into #tmp
from dbo.GetDefendants(@IDFilter) def
inner join player as pl on pl.ID = Def.PlayerID
group by ClientID, Defendant

The only peculiarity is the use of a UDF (the “GetDefendants” function) to retrieve a filtered list of rows from the “Defendants” table.

The actual tables involved aren’t particularly large (generally 1000 to 3000 rows and 20 or so columns, no image or text columns).

I then loaded up the SQL Trace utility, but also came up short. The trace indicated that the query in question was indeed being invoked, but then, nothing.

At this point things are starting to look grim. I could run the particular query manually from SSMS and it always worked properly, no hangs.

So, I started trying things. breaking the query up, pushing the joined tables through TEMP tables, etc. Still got the same hang, but still only occasionally.

I finally tried this alternate version:

select
    def.ClientID,
    def.Defendant,
    PlayerID=pl.ID
into #tmp
from dbo.GetDefendants(@IDFilter) def
inner join player as pl on pl.ID = Def.PlayerID


Select
    ClientID,
    Defendant,
    PlayerID=min(PlayerID)
into #tmp2
from #tmp

Note that the only real difference is that I removed the GROUP BY, and the MIN from the original query, pushed ALL the results into a temp table, then used the GROUP BY on the temp table into a second temp table.

And presto, no more hangs.

This definitely ranks up there with the weirdest SQL issues I’ve ever run into. I’m guessing it’s some combination of blocking, running the same queries (against different sets of rows) multiple times simultaneously (using multiple SQL Jobs), the fact that the server is an 8 core machine and SQL has parallelism turned on, and the use of Group By, but at this point, I haven’t been able to definitively say exactly what the problem is.

Copying Default Constraints to Temporary Scratch (or “Staging”) Tables in SQL Server

5
Filed under SQL

A common pattern in SQL Server development is the use of “staging tables”. These are tables, usually temporary, that contain rows that are manipulated in several ways before being inserted into the “real” table, usually at the end of the entire process and in a transaction.

A very common way to create a staging table is to use SELECT INTO to create a temp table that is an exact replica of the target table, like so:

select top 0 * 
into #TargetTable 
from SourceTable

From there, you can insert new rows into the staging table, manipulate them, and eventually move them into the target table at one time.

However….

If the SourceTable used above happens to have non-nullable columns in it (and corresponding default constraints), the non-nullable attribute of the column will be replicated into the staging table, but the defaults won’t.

This can end up forcing your code to explicitly specify default values for those non-nullable columns. Not a particularly difficult task, but tedious, and error prone. Additionally, it introduces duplicate logic in your SQL (you’ve already set those default values in the definition of SourceTable, so replicating them in your stored proc code is not the greatest idea).

What you need is a way to copy the default constraints to the new staging table after you’ve created it.

And that’s exactly what CopyDefaults is for:

/****************************************************************

Used to copy defaults from a specified source table to a target 
table, usually a temp table created to replicate a particular
table, as in:

    select top 0 *
    into #NewTempTable
    from SourceTable

If the source table contains non-nullable columns that have defaults
the above will replicate the null-nullable attribute of the columns
but won't replicate the defaults, so you won't be able to insert
records into the new temp table without specifying values for all the
non-nullable columns.

Usage:

    exec CopyDefault 'SourceTable', 'TargetTable'
    
You may specify a full name for either source or target

    exec CopyDefaults 'db.dbo.SourceTable', 'otherdb.dbo.TargetTable'
 
****************************************************************/
ALTER PROCEDURE CopyDefaults
    @SourceTable varchar(256), 
    @TargetTable varchar(256)

AS

BEGIN


SET NOCOUNT ON

-- Parse the Database names and provide reasonable
-- defaults
declare @SourceDB varchar(128)
declare @TargetDB varchar(128)
select @SourceDB = parsename(@SourceTable, 3)
select @TargetDB = parsename(@TargetTable, 3)
if @SourceDB is null and left(@SourceTable, 1) = '#' begin
    select @SourceDB = 'tempdb' 
    select @SourceTable = 'tempdb..' + @SourceTable
end    
if @TargetDB is null and left(@TargetTable, 1) = '#' select @TargetDB = 'tempdb' 
if @SourceDB is null select @SourceDB = db_name()
if @TargetDB is null select @TargetDB = db_name()


declare @sql varchar(max)
select @sql=''

-- use a double indirected dynamic sql snippet to
-- create the defaults for the target table, based on those
-- from the Source table.
-- NOTE: the target should NOT already have any of the defaults 
-- established!
select @sql = 
'
declare @sql varchar(max)
select @sql=''''
select @sql=@sql + 
    ''IF  EXISTS (SELECT * FROM ' + @TargetDB + '.dbo.sysobjects WHERE name = '''''' + dc.name + ''xx'''' AND type = ''''D'''')
        ALTER TABLE ' + @TargetTable + ' DROP CONSTRAINT '' + dc.name + ''xx
    ALTER TABLE ' + @TargetTable + 
    ' ADD CONSTRAINT '' + dc.name + ''xx DEFAULT '' +
    replace(replace(definition, ''(('', ''(''), ''))'','')'') 
    + '' FOR '' + c.name + char(13) + char(10) 
FROM ' + @SourceDB + '.sys.default_constraints dc
INNER JOIN ' + @SourceDB + '.sys.columns c ON dc.parent_object_id = c.object_id AND dc.parent_column_id = c.column_id
where dc.type = ''D'' and OBJECT_ID(''' + @SourceTable + ''') = dc.parent_object_id
exec (@sql)' 

-- and execute the SQL 
exec (@sql)

END
GO

Usage is simple. Just create your Staging Table as described above:

select top 0 * 
into #TargetTable 
from SourceTable

Then execute CopyDefaults:

exec CopyDefaults 'SourceTable', '#TargetTable'

Now your defaults should be in place, so newly inserted rows in #TargetTable will automatically get the appropriate default values.

Finally, here’s a test script to exercise and verify the functionality.

SET ANSI_NULLS ON
SET QUOTED_IDENTIFIER ON


/****************************************************************
Create a test Source Table 
****************************************************************/
if OBJECT_ID('tempdb..#SourceTable') is not null drop table #SourceTable
CREATE TABLE #SourceTable(
    [ID] [int] IDENTITY(1,1) NOT NULL,
    [Name] [varchar](50) NULL,
    [Bit1] [bit] NOT NULL,
    [Bit2] [bit] NOT NULL,
    [Address] [varchar](50) NOT NULL, CONSTRAINT [PK_Test1] PRIMARY KEY CLUSTERED 
    (ID ASC)
)

ALTER TABLE #SourceTable ADD  CONSTRAINT DF_Test1_Bit1  DEFAULT 1 FOR Bit1
ALTER TABLE #SourceTable ADD  CONSTRAINT DF_Test1_Bit2  DEFAULT 0 FOR Bit2
ALTER TABLE #SourceTable ADD  CONSTRAINT DF_Test1_Address  DEFAULT '' FOR Address


/****************************************************************
Insert a sample record
****************************************************************/
insert into #SourceTable (Name) values ('TestName')


/****************************************************************
Select to prove the defaults were filled in
****************************************************************/
select * from #SourceTable


/****************************************************************
Replicate the source table
****************************************************************/
if OBJECT_ID('tempdb..#TargetTable') is not null drop table #TargetTable
select top 0 * into #TargetTable from #SourceTable


/****************************************************************
Try to insert and it will fail
****************************************************************/
BEGIN TRY
    insert into #TargetTable (Name) values ('TestName')
    print 'Insert into target succeeded (it shouldn''t have)'
END TRY
BEGIN CATCH
    print 'Insert into target failed (which is correct)'
END CATCH


/****************************************************************
Copy the default constraints over
****************************************************************/
exec CopyDefaults '#SourceTable', '#TargetTable'


/****************************************************************
And retry to insert and it should succeed now
****************************************************************/
BEGIN TRY
    insert into #TargetTable (Name) values ('TestName')
    print 'Insert into target succeeded (it should)'
END TRY
BEGIN CATCH
    print 'Insert into target failed (which should not have happened)'
END CATCH
select * from #TargetTable

Visual Studio 2010 Database Project is Slow

3
Filed under SQL

I’d read lots of good stuff about the “Data Dude” in VS, and 2010 was supposed to be even better, with improved support for roundtripping, version control etc.

Trying it out on a small little sample database showed real promise. It was snappy, searches were fast, version control worked nicely and the round tripping worked fairly seamlessly.

Then I tried it on a production database.

Ugh.

This particular server has 3 db’s, with a combined total of 9000+ objects (tables, functions, stored procs, etc). Not a gargantuan amount but quite sizable none-the-less.

The first hint that things were not looking good was this status bar.

DBProject-1

That number proceeded to tick down, by 10s and 100s, then suddenly jumped up to 90000+ and continued ticking down.

While it’s ticking, VS just drags. Badly. Menus take 10+ seconds to pop up. Code editing is unbearable.

Alas, it looks like all is not milk and honey in VS Datadude land just yet.

Back to Toad and SSMS.

SQL for Deleting Records with No Related Records

0
Filed under SQL

Had another interesting SQL challenge come up today. Basically, I had two tables. I needed to delete all the records from Table A that did not have any related records in Table B.

Simple enough. The existing code was like so:

delete x
from #tmp x
left join #tmp as y on x.ID=y.ID and y.Status<>'dismissed'
where x.Status='dismissed'
    and y.ID is null

Now, in this case, Table A and Table B happen to be the same table, just interrelated, but I had similar situations with distinct tables.

Since the table in question was a temporary table, there weren’t any indexes defined, so that would account for some of the slowdown, but this query was taking forever to finish.

Just looking at the query, though, it struck me that the LEFT JOIN was likely doing way more work that necessary, which can be confirmed via a quick check of the execution plan.

The problem is that the join has to go ahead and connect all the related records that are actually related, even though, in this case, those are the very records we don’t care anything about (notice the y.Person is null clause).

I’m guessing that the optimizer can’t or doesn’t realize that we don’t actually care about those rows in this case. Not surprising, but definitely interesting.

So, a quick rewrite is in order. I chose a correlated subquery:

delete x
from #tmp x
where x.Status='dismissed'
    and not exists(
        select top 1 1 from #tmp y where y.ID = x.ID and y.Status<>'dismissed'
    )

Believe it or not, this version executed in under a second against the exact same million+ count rowset. The difference was surprising, and I’m not often surprised anymore by SQL optimization tricks.

Ok, a few things to note:

  • The table still doesn’t have any indexes. Things will likely be even faster with some good indexes on the table. But this is a temp table, so you’ll have to weigh the cost of creating the index vs the savings you get for additional queries that might use it while the table exists.
  • Since I don’t actually care about any of the related records, I select the scalar value “1” for the result of the subquery. Technically, this is not actually necessary since the NOT EXISTS clause is used, which usually causes the SQL optimizer to automatically forgo returning any actual data. I just like to be explicit about things.
  • Further, since I only want to know whether any related records exist or not, I can select only the TOP 1 related record, and get it or nothing. This allows some additional SQL optimizations that center around use of the TOP clause, which is a good thing.
  • And finally, use of the NOT EXISTS clause allows even more internal SQL optimizations.

Bottom line

Definitely keep correlated subqueries in your SQL toolbelt. This one example shaved more than 20 minutes off the execution of a particular stored proc.

Are correlated subqueries always the answer? Oh, hell no. Often, they’re the worst approach.

Are there other ways to do this? Certainly. A CROSS JOIN is the first thing that comes to mind. Establishing indexes on the temp table would certainly help as well.

But as fast as this solution is, I didn’t take things any farther.

Collapsing Date Ranges in T-SQL

0
Filed under Code Garage, SQL

imageI’ve been working on contract for a month or so now, helping to speed up some back end database summarization activity that had gotten slow enough that it was threatening to bleed into the next day’s time frame. Yuck!

Mostly standard stuff, tweaking indexes, ditching cursors, etc.

But one problem had me scratching my head today.

Essentially, I had a table of Clients, each one of which could be linked to any number of “Exposure” records, each of those having a start and stop date of exposure.

The trick was to determine how many total years of exposure a client had.

The thing is, each client might have multiple exposure records with overlapping (or not) time frames. So essentially, the problem boiled down to collapsing all the exposures to a single sequential list of non-overlapping exposure timeframes. From there, it’s trivial to just add up the differences of the date for each time frame.

But how to get there?

Cursors

The existing code was working fine, but took upwards of 40+ minutes. Essentially, it worked via cursors and functions (with more cursors) to collect all the years of all the timeframes for each client, convert them to a list of singular year elements, then convert that to a recordset and finally count up the entries. Workable, but terribly slow.

Skinning the Cat

I’d done something similar ages ago for a medical billing system, so I knew this kind of manipulation could be fast. But I’d long since forgotten exactly how I’d done it.

However, a few Google searches and I landed on Peter Larsson’s blog post about collapsing date ranges using what he calls the “Clustered Index Update”. It’s 3 years old, but definitely something worth throwing in your bag of SQL tricks!

First, create some test data:

create table #test(
   id int,
   seq int,
   d1 datetime,
   d2 datetime)

insert into #test
select 1, null, '2005', '2006' union all
select 1, null,'2007', '2009' union all
select 2, null,'2001', '2006' union all
select 2, null,'2003', '2008' UNION ALL
SELECT    3, null,'2004', '2007' UNION ALL
SELECT    3, null,'2005', '2006' UNION ALL
SELECT    3, null,'2001', '2003' UNION ALL
SELECT    3, null,'2002', '2005' UNION ALL
SELECT    4, null,'2001', '2003' UNION ALL
SELECT    4, null,'2005', '2009' UNION ALL
SELECT    4, null,'2001', '2006' UNION ALL
SELECT    4, null,'2003', '2008'

Next, make sure you have a clustered index across the ID and both Date fields:

CREATE CLUSTERED INDEX ix_id ON #test (ID, d1, d2) with fillfactor = 95

Be sure that the SEQ field is initialized to NULL or 0 (already done via the population code above).

Then, create several variables to assist with counting through the records to set the SEQ field. Use a SELECT to initialize those variables:

DECLARE    
    @id INT,
    @Seq INT,
    @d1 DATETIME,
    @d2 DATETIME
SELECT TOP 1
    @Seq = 0,
    @id = id,
    @d1 = d1,
    @d2 = d2
FROM #test
ORDER BY id, d1

The Trick

Finally, update the SEQ column using the “Clustered Index Update” trick:

UPDATE #test
SET   
    @Seq = CASE
        WHEN d1 > @d2 THEN @Seq + 1
        WHEN id > @id THEN @Seq + 1
        ELSE @Seq
        END,
    @d1 = CASE
        WHEN d2 > @d2 THEN d1
        WHEN id > @id THEN d1
        ELSE @d1
        END,
    @d2 = CASE
        WHEN d2 > @d2 THEN d2
        WHEN id > @id THEN d2
        ELSE @d2
        END,
    Seq = @Seq,
    @id = id

Essentially, what’s happening here is that since the update doesn’t specify an order, SQL will update via the physical order in the database, which is the same as the clustered index (a clustered index determines the physical ordering of records in the table). And since the records are ordered in ID, D1, D2 order, the SEQ column will be updated with an incrementing number that effectively clusters overlapping ranges together.

Since the records are already physically in that order, this update happens lightning fast because there’s no need to perform any index lookups.

You can see the end result by selecting all the records at this point:

select * from #test

Now, the data is ready, you just have to query it using that SEQ column. For instance, this SELECT will retrieve the start and end date of each non-overlapping cluster of dates belonging to each ID.

SELECT      
    ID,
    MIN(d1) AS d1,
    MAX(d2) AS d2
FROM #test
GROUP BY id, Seq
ORDER BY Seq

Mr. Larsson also describes a query to retrieve the “gaps” (or missing date ranges), which could be handy for a different class of problem.

If, like me, you also need a grand total of the number of years, first, you can get the years in each collapsed timeframe and then get the grand total years, like this:

select 
    ID,
    Years = Sum(Years)
From (
    SELECT     
        ID,
        Years=Year(MAX(d2)) - Year(Min(d1)) + 1
    FROM #test
    GROUP BY id, Seq
    ) a
Group by id
Order by id    

Using this trick took this particular query (actually a sizable set of queries and cursor loops) from 40+ minutes to under a minute, with virtually all of that minute being spent filtering down the set of records that I needed to specifically collapse the timeframes on (in other words, doing stuff unrelated to actually collapsing the date ranges). In all, several million records being processed in a few seconds now.

Good stuff.

Installing SQL Express 2008 Silently

2
Filed under Installations, SQL

I was recently upgrading an app from shipping SQL Express 2005 to 2008 and ran into a few surprises.

First, the command lines for the two installers are about as different as you can get.

The good news: The command line to extract files from the Self Extracting archive remains the same.

So, for SQL 2005 Express, you use this:

SQLEXPR32.EXE /Q /X:”{path to extract all SQL Installer files to}”

and for 2008 you use this

SQLEXPR_x86_ENU.EXE /Q /X:”{path to extract all SQL Installer files to}”

Typically, your install will drop the SQLEXPR32.EXE or SQLEXPR_x86_ENU.EXE files somewhere during the install, and then execute the above command line to extract all the necessary files to install SQL Express.

Then, you’ll use the command line discussed below to actually install SQL Express.

And finally, you’ll clean things up by deleting the EXE file above and all the extracted files used for the install.

The Bad News

Unfortunately, once you get the installation extracted, the command line to actually perform the installation is completely different.

For 2008, there are a huge number of command line parameters. Luckily, not all of them need to be specified to perform an unattended, nested install (ie an install of SQL Express 2008 from your own install). See here for a complete list of all the command line parameters available.

Obviously, your needs are going to dictate what options you have to specify. In my case, I needed a very bare bones installation, no fulltext search, reporting services, etc, and definitely no network support; this instance of SQL Express is intended to be accessed ONLY from the machine onto which it’s installed.

Given that, the command line is (all on one line):

{path to the SQL installation fileset you extracted above}setup.exe
/INSTANCEID=[SQLINSTANCENAME]
/ACTION=Install
/INDICATEPROGRESS=True
/HIDECONSOLE
/FEATURES=SQLENGINE
/QS
/INDICATEPROGRESS=False
/INSTANCENAME=[SQLINSTANCENAME]
/AGTSVCSTARTUPTYPE=Manual
/ISSVCSTARTUPTYPE=Automatic
/ISSVCACCOUNT=”NT AUTHORITY\NetworkService”
/ASSVCSTARTUPTYPE=Automatic
/SQLSVCSTARTUPTYPE=Automatic
/SQLSVCACCOUNT=”NT AUTHORITY\SYSTEM”
/SECURITYMODE=[SECURITYMODE]
/SAPWD=[SAPWD]
/ADDCURRENTUSERASSQLADMIN=True
/TCPENABLED=0
/NPENABLED=0
/BROWSERSVCSTARTUPTYPE=Disabled
/RSSVCSTARTUPTYPE=Disabled
/RSINSTALLMODE=FilesOnlyMode

Now, granted, that’s one gargantuan command line! Remember, the whole thing is executed as a single command. I’ve just put line breaks in so it’s readable. Also, keep in mind that you CAN specify all these parameters in a “response file” and then just pass it to the Setup.exe via the /CONFIGURATIONFILE parameter, like this:

SETUP.EXE /CONFIGURATIONFILE=”myresponsefile.rsp”

But, that requires creating a separate text file, and potentially deleting or dealing with it afterward, so the command line route tends to work better for nested installations.

The key parameters to be concerned with are:

ACTION This has to be install.

INDICATEPROGRESS If the console window is shown during the install, this will cause a very verbose log of what is happening to be echoed to the console window as well as the install log file. If you hid the console window, this parameter doesn’t appear to have any effect.

QS This stands for Quiet Simple. In other words, the install will show a progress box but no other ui to the user. And no prompting.

FEATURES Determines what elements of SQL Express you want installed. Review the help page above for options, but the main thing to install is SQLENGINE.

HIDECONSOLE Very important. Without this switch, you’ll see a DOS box console window open up during the install. Very disconcerting and not even remotely appropriate for a user facing installation.

INSTANCEID and INSTANCENAME Usually, this should be SQLEXPRESS, though you may want to use a non-standard instance name in some cases.

SECURITYMODE and SAPWD You must provide a System Admin Password (the SAPWD) if you set SECURITYMODE to SQL. Also, keep in my that there may be group security policies in place on the machine that regulate the strength of the password (in other words, the SA password you choose, or that you allow your installer to choose, may need to be a certain length, contains numbers AND letters, etc).

TCPENABLED and NPENABLED These options enable or disable support network connections (TCP or Named Pipes). A 0 disables them, which is generally a good idea unless you have a reason to allow network connections into this SQL Express instance. In those cases, it’s usually best to require the installer to install SQL separately.

ADDCURRENTUSERASSQLADMIN This may or may not be appropriate depending on who is likely to be installing your package.

SQLSVCACCOUNT Actually all of the *SVCACCOUNT” options. These control the domain credentials to use for the various SQL Express services that are installed. You would either need to use the local SYSTEM account, as my example shows, or you’d need to prompt the user during the install to get the required domain login name and password. From a simplicity standpoint, using the local SYSTEM account is the most straightforward. But how you assign service account credentials will really depend on the app you’re installing.

So there you have it. Not hard, but not the same as SQL 2005 either.

Nested SQL Express Installation – Part Deux

3
Filed under Installations, SQL

I wrote about various troubles nesting SQL Express installations a few days ago here.

I just wanted to add a little more info for those interested.

Come to find out, it’s still possible for SQL Express to end up requiring a reboot, which, if you’re install was planning on performing DB tasks, puts a cold, wet, nasty damper on your fireworks quick.

But, from what I can tell so far, it’s almost always going to be related to a file or files that the SQLExpress install needs to replace but can’t because they’re locked.

I’d had some difficulty finding any info on how you might determine exactly what file(s) it was that were locked when I came across this post on MS Technet.

Basically, immediately after you install, but BEFORE you actually reboot, fire up REGEDIT and check out:

HKLM\system\currentcontrolset\control\sessionmanager\pendingfilerenameoperations

The value should contain the names of any files that couldn’t be replaced during the install and are queued for replacement.

At that point, it’s just a matter of determining which process(es) have those files open, and making sure your install verifies that those processes are closed before allowing the installation to continue.

In my case, so far it’s always been an issue with MSDE 2000 already installed a running on the machine. The SQLDMO.DLL is used and locked by the running MSDE process, but the SQLExpress install needs to replace it.

It’s a royal pain to be sure, but at least there is something that can be done about it.

Are you a Neanderthal SQL Programmer?

3
Filed under SQL

I generally can appreciate what Joe Celko brings to the table in terms of SQL programming and theory, but a recent article of his had me scratching my head, even considering his sometimes Ivory Tower approaches.

The article is at Intelligent Enterprise here.

What caught my eye was the following paragraph. He’s discussing his own classification system of keys in databases and one of the types is described thusly:

3. An “exposed physical locator” is not based on attributes in the data model and is exposed to the user. There is no reasonable way to predict it or verify it, since it usually comes from the physical state of the hardware at the time of data insertion. The system obtains a value thru some physical process in the storage hardware totally unrelated to the logical data model ” for example, IDENTITY columns or other proprietary, non-relational auto-numbering devices.

Technically, these are not really keys at all, since they are attributes of the physical storage and are not even part of the logical data model. But they are handy for lazy, non-RDBMS programmers who do not want to research or think! This is the worst way to program in SQL

So, to paraphrase, he’s saying that if you use IDENTITY columns in your database schemas, you’re “lazy” and “do not want to research or think”

Uhuh.

So how about it, you lazy, slovenly, heathen SQL programmers out there that dare to use Identity columns?

And in case it’s not obvious, I can’t disagree more with Celko on this point<g>