Tools, Tools, Tools!

0
Filed under Uncategorized

As a software developer, I spend quite a lot of time using tools of the trade. IDE’s, text editors, command line utilities like GIT, quick and dirty BAT files, file searchers, file comparers, you name it. There is a virtually limitless supply of tooling out there for software devs to (hopefully) make our lives easier.

And things like desktop icons, the TaskBar (in Windows anyway), hotkeys, macros, right click context menus, etc, make it so that the right tool is never more than a click or keypress away.

I’ve always been a bit of a “maker” and I’ve collected a pretty sizeable arsenal of actual, physical, tools  over the years. However, as that collection as grown, I’ve found myself more and more frustrated at the prospect of actually building anything because it can be so time consuming to simply find the tools I need for the job.

When I first moved into my current house, I spent a good bit of time building up some pegboard cabinets for storing tools and other bits.

They’ve worked fine for what they are, but I’ve often found that where I need whatever tools is not where they are. So I end up walking back and forth to the garage, picking up the tool I need at the moment and returning 5 minutes later for whatever else I need, repeat continuously….

So I found a toolbox and loaded it up. It’s nice and portable, but I often spend more time finding the tool I need in it, than I do making whatever it is I’m making. Decidedly, as a colleague used to say, “sub-optimal”.

And then, about a month ago, I stumbled across Adam Savage’s (yes, the “MythBusters” guy) new endeavor, Tested,  and this video he did back in 2015.

Basically, he describes several concepts, including:

  • his Theory of First Order Retrievability, meaning you should never have to move any tool to get to any other tool.
  • The F*** Drawers Axiom, basically that drawers are where good tools go to die.
  • and then general idea of “tools should easily end up where you need them”. Ok, this one is my summarization of a good bit of the discuss he has during the video…

Watching that video was an almost transcendental, profoundly eye-opening moment. And it turns out, a lot of other people thought so too. Just google “Adam Savage inspired tool cart” to see what I mean.

And so, a few weekends, and a bunch of scrap I had lying around later, I now have my very own version of Mr. Savage’s tool cart concept.

Every cart I’ve come across while researching the idea is similar but different, depending, of course, on each individuals needs and their own collection of tools.

In my case, lots of pliers, knives, screwdrivers, levels, straightedges, etc.

Starting at the bottom is a simple rack for my lesser used tools, pliers, crowbars, nippers, scissors, etc.

Next, is a hammer rack. I got the inspiration from one of the many tool carts you can find via Google. Mine added small holes for brass hammers, mallets and others.


Moving up from there is a pliers rack, plus a panel for sockets. The socket holders are Olsa Tools brand I picked up on Amazon. They’re one of the few pieces I purchased because I didn’t have anything already, and scratch building something for that just seemed like too much work.

Next up, I used a red pegboard toolrack I’d had for ages. Just made a panel to screw it to and mounted that. It’s great for screwdrivers, chisels, knives, pencils, etc.

Behind that is a row of removeable (yellow-blue) parts trays that came off my old pegboard cabinets. The fact that they fit there perfectly was a nice bit of serendipity in this build!


Up top, I built a small items sorter out of scrap pegboard. I left a small ledge toward the front that I drilled holes in to wrangle all my smaller pliers, wirecutters, calipers, etc.

Over to the side, I made a slide-in rack for my vise-grips, and on top of that, a small rack for a set of adjustable wrenches. You can’t see the embedded magnets in the rack that keep the wrenches from swinging when I move it.


And finally, there’s space around back for a reasonably sized clamp rack. I also put two steel rods through the inside and hang all my spring clamps off them. They’re easily accessible from the sides or the back, so no violation of the First Order Retrievability theory here!


It’s very close to “done”, at least for the moment, though there’s still a number of bit to finish out.

  • I’m building holsters for my power drill and hammer drill.
  • Magnetic catches for my various saws, hacksaws, coping saws etc.
  • A tray and magnetic catch for levels, squares, T squares, and rulers.
  • A slide out rack for hex keys, and xacto knives.
  • Magnetic tool bars for sticking smaller items like micro screwdriver bits to.
  • Anything else I can dream up!

And finally, the whole thing is on nice large locking casters I picked up from a garage sale. Makes moving it around the garage and even into the house trivially easy. And since it’s only about 18 inches deep at the base, it’ll go through even the smaller 24″ doors in the house if necessary.

All in all, a fun and easy build that has already saved me a ton of time with getting to the right tool easily and quickly. And a nice side effect from putting it together is that I’ve unearthed tools that were so buried in my toolbox, I’d forgotten I had them. Having everything “out in the open” so to speak, really serves as an inspiration when looking for that “right tool”.

Highly recommended! And my hat’s off to Mr. Savage, for reminding me that many of those things I do in the ethereal world of bits and bandwidth, can actually be applied to the physical world just as effectively.

Using only Specific Monitors with RDP Connections

330
Filed under Uncategorized

I’ve used RDP (Remote Desktop Protocol) for years to work on multiple systems simultaneously.

But one thing that’s bugged me for a while is that, with multiple monitors, you have basically an “All or One” situation.

There’s a nice checkbox on the RDP configuration form that allows you to “Use all monitors”.


But that’s all you get. If you have 3 or more monitors, there’s no way to specify only 2 of them to use for the RDP connection.

Or is there?

Turns out, Scott Hanselman turned up an hidden configuration element for RDP connections that does exactly this. Read up about it here.

The gist is to setup an RDP connection as normal, turn on the “Use All Monitors” option you see above, and save the connection.

Then, use a editor (Notepad will do just fine), and edit the *.RDP file you just created.

It’s a plain text file with a pretty straightforward format.

Somewhere in it, you should see:

use multimon:i:1

Just add another line like below:

selectedmonitors:s:0,2

where the 0(zero) and the 2 are the monitors that you want to use.

In my case, 0 is my primary and 2 is my leftmost monitor. You can find the monitors numbers by checking your display properties.

I’ve tried a few terminal apps out there (like Terminals), but, unfortunately, none of them seem aware of this either.

Launching into a Zoom Meeting directly from a Windows Shortcut

230
Filed under Uncategorized

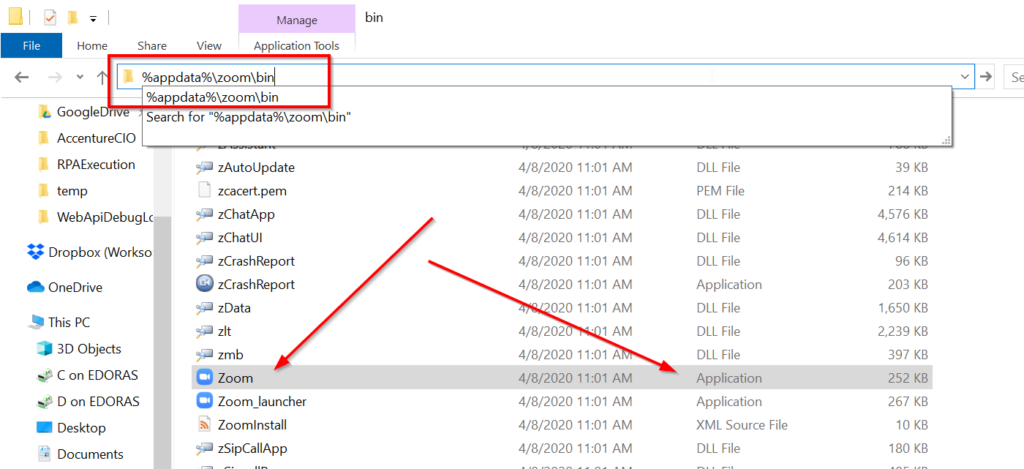
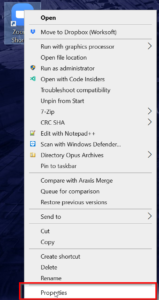
Zoom has rocketed to prominence lately as just about the choice when it comes to online meetings.

I’m not yet convinced its the best, but it is pretty good, easy to use (my 16yo uses it for school during this wonderful quarantining time!), fast (worked perfectly well at my mom’s lake house with absolutely terrible internet), and doesn’t really pull any surprises, other than the myriad security issues that have turned up over the past few months.

Still, it does work well, but there’s one thing that was annoying me.

I have several meetings that I jump onto regularly, and when I do from a browser, or an Outlook link, etc, I get this annoying window from Edge Chromium:

Now, true, it’s not that big a deal, but it is annoying, so I set out to figure out a way to launch a meeting from a regular ol’ Windows shortcut with no annoying prompt.

I had a number of false starts, but eventually discovered a blindingly simple command line that works perfectly, as long as you follow a simple rule.

The command line?

            %appdata%\Zoom\bin\Zoom.exe --url=zoommtg://zoom.us/join?confno={your meeting number}

And the Rule?

Don’t put any dashes in your meeting number.

That’s it.

Now, you can put that in a good ol’ BAT file easily enough, or, just open Explorer, enter %appdata%\Zoom\Bin in the address bar and press enter.

Then scroll down to find the Zoom.exe application.

Right click on that and drag it to your desktop to create a Shortcut to the Zoom.Exe app.

Now right click on the shortcut and choose Properties:

You’ll get the standard Shortcut properties dialog.

Scroll to the end of the “Target” value, and paste in part after Zoom.exe from above, so, this:

                           --url=zoommtg://zoom.us/join?confno={your meeting number}

If you’ve done it right, the value in the Target field should be just like the command line at the top of this article.

Click Ok, and you’re done.

No more annoying “The Site is trying to open Zoom” messages.

And you can create as many shortcuts to as many meetings as you need!

Shout out to NameCheap.com

0
Filed under Uncategorized

Just wanted to make a quick shout out for Namecheap.com. I’ve used ServerGrid.com for many years as my web hosting provider and they’ve been really great. But some recent problems (and a price hike) made me start looking elsewhere.

NameCheap turned up in some googling I did and after a month or so now, I have to say I’m very pleased.

I don’t get anything for this. Just wanted to post about my experiences. Their support has been very fast, knowledgeable and spot on when I’ve needed them. They use the latest CPanel, which is quite nice.

Email support, domain forwarding etc all work just like you think they would. WordPress was very easy to set up, even without going the “Managed WordPress” route, which they also have.

They may have “cheap” in the name, and their pricing is definitely competitive, but so far, they’re anything but low rent!

Unable to PING under Windows 10 anymore

1
Filed under Uncategorized

About a month back, my main workstation updated itself to Windows 10 Creators Edition overnight.

I really didn’t even notice it at the time.

However, over the last month, I’ve had several bits that had been working stop for unexplained reasons.

The most recent that I could no longer PING other machines (specifically a RaspberryPiZero W) on my network. Worse, at least in this particular case, was that I couldn’t PUTTY into it iether.

However, I could browse to a Samba share I’d set up on the Pi and view it just fine.

After a LOT of gnashing of teeth, I discovered that for some reason, the PING hostname lookup had become CASE SENSITIVE!? What? DNS lookups should never be case sensitive.

Sure enough, though,

ping pictureframe

failed but

ping PICTUREFRAME

worked just fine.

Further, using the UPPERCASE version in Putty worked, but using the lowercase version failed.

There’s a ton of posts about this very thing, with equally as many ideas on how to fix it.

I really did not want to write up yet another BAT file and add it to my startup process, so I kept digging.

The Simple Solution

Turns out, I had IPV6 disabled in Network Properties. Turning it on fixed the lookup, even in IPV4 mode.

To do this:

  1. Got to Settings/Network/Change Adapter Options/
  2. Right Click on the network adapter in use and Click Properties.
  3. Scroll down till you find Internet Protocol Version 6
  4. Click the checkbox to enable it and close all the Setting windows.

In my case, it didn’t even take a reboot.

Granted, now, when I do a ping, I usually get a very unfriendly IPV6 address, but that’s easily remedied by using

ping computername -4

On to the next problem!

Fun With SQL (OVER and PARTITION clauses)

0
Filed under Hiring, SQL

I’ve been interviewing over the last few weeks for a new position (If anyone has a need for a very experienced .Net developer with some recent Ruby/Rails/Javascript/Coffeescript/JQuery etc chops, shoot me an email!)

At any rate, one company had an interesting SQL challenge.

In a nutshell, given a table with an ID field and a FLAG bit field, find all the consecutive rows where the FLAG field is 1 (ie a bad record).

The trick was that the output needed to look like:

ID RANGE        Error Count
4000-6000       2001

First, lets insert a CSV file into a table….

BULK INSERT Flags
FROM 'c:\dev\darin\sqltest\sqltest.csv'
WITH
(
FIELDTERMINATOR = ',',
ROWTERMINATOR = '\n',
FIRSTROW = 2
)
GO

They supplied a 1.6 million row sample table, and expected sub 10 second response time. Sooooo, you also might want to add a clustered index to the ID field.

Let’s see some SQL!

With the sample table in place, I could get down to business.

I’ll admit, I had to google the syntax of the OVER and PARTITION clauses in T-SQL. They’re not something I use every day.

First, I needed all the rows, with a group number grouping all the consecutive rows who’s flag value was 1. I used a Common Table Expression for this. I could have used temp tables and it would have resulted in about the same performance, but… what the hey!

WITH parts AS (
   SELECT *, id - ROW_NUMBER() OVER (ORDER BY id) AS grp
   FROM flags
   WHERE flag = 1
)

Next, I needed the count of each group as part of the result set….

WITH counts AS (
   SELECT *, COUNT(*) OVER (PARTITION BY grp) AS cnt
   FROM parts
)

With those two CTEs in place, all that was left was the output Select….

SELECT cast(min(id) as varchar(20)) + '-' + cast(max(id) as varchar(20)) as IDRange, 
   cnt as ErrorCount
FROM counts
WHERE cnt >= 1000
GROUP BY grp, cnt
ORDER BY IDRange

In this case, I only cared about blocks of errors of more than 1000 rows. The concatenated SELECT is just to make a nice output format. realistically, I’d probably only select MIN(ID), MAX(ID), CNT

I haven’t used CTE’s a lot, but I’m finding more and more uses for them.

And the OVER clause is something I really need to get more familiar with.

For the 1.6 million row source table, I was getting sub 2 second response times on this query. No doubt, there’s ways to speed this up, but that’s not too shabby.

PhaseShift and Frets On Fire X Song Packs

127
Filed under Arcade, AutoHotKey, Frets On Fire, Games, Guitar, Stepmania

PhaseShift is an excellent freeware (not open source yet, as far as I can tell, but here’s hoping) version of the RockBand genre of games. It’s even more interesting in that it can interoperate with guitar controllers, game drum kits, vocals, keyboards, MIDI, and even step pads (for Dance Dance Revolution style games, all at the same time!).

Very cool stuff.

What’s even better is that it can read both Frets on Fire songs as well as Stepmania format songs.

Mostly.

There are a ton of great song packs available out on the web, and most that I’ve found work seamlessly with PhaseShift. However, I’ve run into a bunch that do not.

The problem appears to be with the NOTES.MID file (the file that contains all the midi notes that is used by the game to show the onscreen “notes”).

After some digging using a hex editor (my favorite right now is Tiny Hexer), I discovered that in all the cases that failed, the NOTES.MID file appears to contain extranous junk. In many cases, it was a string of keyboard key names, in others it was code snippets. I’m guessing that whatever MIDI editor was used to generate those MID files didn’t properly clear garbage out or compact memory.

At any rate, FoFix appears to ignore the extra junk but PhaseShift does not.

Enter EOF

EOF is a song editor for “fretting” songs for use with rhythm games like Frets On Fire and PhaseShift. The latest version even has specific features to take advantage of elements of PhaseShift that don’t exist in Frets On Fire.

I found that simply using FILE – IMPORT MIDI and importing the NOTES.MID file into EOF, then immediately SAVING the file (and clicking YES to the prompt of “The file hasn’t changed, Save Anyway?”), fixed the problem for every single song I tried it on.

It worked so good in fact, that I wrote up a simple script in AutoHotKey to just run through all the files in a directory and perform those magic steps on them

/*
Convert songs via EOF
*/


F12::
Reload
return


F11::
loop, 1 {
    ;match anywhere in title
    SetTitleMatchMode, 2
    IfWinExist \Songs\
    {
        WinActivate
    }
    else
    {
        msgbox No Window
        return
    }

    ;Copy full path name
    sleep 500
    SendPlay ^+C
    sleep 500
    SendPlay ^+C
    ;msgbox %clipboard%

    ;Over to EOF
    IfWinExist EOF -
    {
        WinActivate
    }
    else
    {
        msgbox No EOF
        return
    }


    sleep 500
    SendInput {F6}{F6}
    sleep 500
    SendInput %clipboard%{enter}
    sleep 1000
    Send ^s
    sleep 500
    Send ^s!FS
    sleep 200
    SendInput Y
    sleep 200
    SendInput Y


    ;Back to DirOpus
    IfWinExist \Songs\
    {
        WinActivate
    }
    else
    {
        return
    }

    sleep 500
    SendPlay {down}

}

Change the loop value from 1 to some count if you want to run it through more than one song at a time.

To explain:

The F12 key I’ve mapped to a reload just to make editing this script easier. It’s not necessary for actually running the script.

The F11 key hooks to the secret sauce.

I used the SEARCH feature in Directory Opus to list only the NOTES.MID files from all songs in all subdirectories of a folder I was targeting. If you don’t have DirOpus, you’ll need to recode the script to accommodate some other logic for getting the list of full pathnames to process.

The script starts by activating the DirOpus window and copying the full path to the selected NOTES.MID file.

Then it switches to EOF, (which needs to already be loaded), and performs the FILE – IMPORT function, pasting in the filename of NOTES.MID.

It then immediately does a FILE – SAVE (and supplies a few Y keypresses to answer the “save anyway” prompt.

And finally, it switches back to DirOpen and moves down to the next file.

It’s a hack to be sure. But it worked a treat for me.

Rock on!

Frets On Fire X From Source Code

3
Filed under Games, Python

poseNOTE: In the process of putting together this post, I discovered both the game PhaseShift, and a fantastic theme for it based on RockBand 3. PhaseShift appears to be everything I was looking for in modifying FoFix and a WHOLE LOT MORE. I pressed on with this post for two main reasons:

  1. It might serve to help anyone else who may be interested in continuing on with more development on FoFix
  2. I had a lot of fun getting everything together and just seeing it work from source.

Still, I highly recommend checking out PhaseShift and the themes that are available for it. There seems to be a lot more work going on with it these days than any of the other rhythm games out there.

If you haven’t played it, Frets on Fire is a RockBand clone from back around 2009. You can read more about the genesis of the game here.

It’s written in Python and open source, so there have been a number of mods made to the original game over the years.

By far the best, in my opinion, is the Frets on Fire X mod, usually called FoFix. Tons of great changes and improvements, plus a fantastic looking theme called ‘RockBand’.

The unfortunate part is the FoFix (and Frets on Fire in general) appear to have fallen by the wayside in terms of people working on them. That’s really too bad, as

it’s a fantastic game which works quite seamlessly.

Still, as good it as it, it could always be better, right?

Features

Really, all I set out to do was add code to the song selection list that would show what instruments were available in each song, without having to actually pick the song and then getting a “This song has no drum part” message. Pretty simple stuff. But this is Python, and open source, and while I’ve worked with open source before, Python was a new beast for me to tangle with.

Getting Organized

If you’re like me, you already have a copy of FoFix installed, it’s just that you run the EXE version of the game, and not the source code version.

If you want to make any changes, you’ll need to be running from the source code itself. That’s what all this is about.

First things first though. This all might not be strictly necessary, but I don’t want to wreck my playable install of the game, so…

  1. Copy the entire FoFix installation to somewhere else, I created a folder called FoFix35 (since 3.121 was the current version).  However, If you have a LOT of songs in your \data\songs folder, don’t copy all of them. There’s no need. Just a few will do. So, at this point, you should have 2 root folders somewhere:
    \FoFix (your original Frets On Fire X installation)
    \FoFix35 (the copy, minus most of the songs)
  2. Create a \FoFix35\src folder if it doesn’t already exist (this is where you’ll want the source files)
  3. Create a \FoFix35\installs folder (this is where I downloaded all the necessary files, see the next section)

The Downloads

Download all these files into the installs folder you created above.

First, the code. You’ll likely want the most recent, active version of FoFix, which, as far as I can tell is 3.121

https://codeload.github.com/fofix/fofix/zip/Release_3.121

Python (Duh, right? You’ll need the 2.6 version)

https://www.python.org/ftp/python/2.6.6/python-2.6.6.msi

PIL (Python Imaging Library, you’ll want 1.1.6, not 1.1.7!)

http://effbot.org/media/downloads/PIL-1.1.6.win32-py2.6.exe

PyAudio

http://people.csail.mit.edu/hubert/pyaudio/packages/pyaudio-0.2.4.py26.exe

PyGame (I used the 1.9.2a version, but if that doesn’t work for you, try installing 1.9.1 over it)

http://www.lfd.uci.edu/~gohlke/pythonlibs/zit7bosa/pygame-1.9.2a0.win32-py2.6.exe

http://pygame.org/ftp/pygame-1.9.1.win32-py2.6.msi

PyOpenGL

http://www.lfd.uci.edu/~gohlke/pythonlibs/zit7bosa/PyOpenGL-3.1.0b2.win32-py2.6.exe

PyOpenGL Accelerator

http://www.lfd.uci.edu/~gohlke/pythonlibs/zit7bosa/PyOpenGL-accelerate-3.1.0b2.win32-py2.6.exe

PyWin32

http://softlayer-dal.dl.sourceforge.net/project/pywin32/pywin32/Build216/pywin32-216.win32-py2.6.exe

The Win32 Dependency Pack

https://fofix.googlecode.com/files/fofix-win32-deppack-20130304.zip

And finally, NumPy (Note: you’ll want this version in particular, older versions didn’t work for me)

http://softlayer-dal.dl.sourceforge.net/project/numpy/NumPy/1.8.1/numpy-1.8.1-win32-superpack-python2.6.exe


Installing Everything

First, unzip the Source code zip file into the \src folder you created above. When done, you should have

\FoFix35\src\midi

\FoFix35\src\scripts

\FoFix35\src\win32

plus a bunch of *.py files in the \FoFix35\src folder itself


Next, dblclick the Python installation exe and work your way down the list above, till you get to the Win32 dependency pack. Just accept the defaults and you should be able to just install each one after the other.

The dependency pack itself is a zip file that needs to be unpacked in a specific spot.

The zip contains a root folder, ‘deps’. This ‘deps’ folder should be unpacked into:

\FoFix35\src\win32

such that when you’re done, you end up with:

\FoFix35\src\win32\deps

and this deps folder contains ‘bin’, ‘include’ and ‘lib’ folders.

Finally, finish up with the numpy package.

Checking it out

If everything has gone well, you should be able to navigate to

\FoFix35\src\scripts

and run

RunFofFromSources.bat

FoFix should compile and open its normal intro window.

If it doesn’t, be sure to check the log file

\FoFix35\src\fofix.log

This should give you a pretty good indication of what’s gone wrong.

Wrapping Up

If things do go wrong, first check the log I mentioned above.

I ran into several issues while working through this process.

  • I got the wrong versions of some libraries, based on outdated information on the web (Yeah, this post might eventually end up in that same boat!).
  • I started with the wrong version of Python (2.4, you need 2.6).
  • NumPy gave me some issues, in that I didn’t have the right version.
  • The Python Imaging Library I had to back out to an older rev to get functioning

I stuck with the 32bit version of everything. It might be possible to get 64 bit working, but I didn’t go that route.

I’ve played FoFix for almost 4 years now, using 2 Ashley Rock Axe wireless controllers, as well as a Red Octane wireless drum controller. Great fun! And now I can experiment with some Python coding to boot!

Viewing CHM files from Network Drives

1
Filed under Hack of the Day, Troubleshooting

Ok. So this is not a particularly new problem. You get an application, which comes with a help file in the CHM (Compressed Hypertext) format. Works great as long as you don’t try and open it from a networked drive. <sigh>

So, what to do?

Well, Microsoft has a pretty complete suggestion here.

But, it’s registry hacks, it’s not pretty, and, it didn’t work for me on a  Win7 system.

The Help and Manual folks put together a pretty interesting alternative here but this is assuming you’ve got a product you’re installing. Not great for a typical user.

A simpler way

After researching this way more than I should have, I ended up with a simple straightforward solution that works reasonably well.

Just zip the CHM file into a zip file in the same location.

Yes that’s it!

image

Notice in the image that I have zipped the 7Zip CHM file into a zip file. I renamed the file as 7-zip.chm.zip, just to remind me that it contains the CHM file.

To read the file, just double click the ZIP file, which, in modern Explorer windows, will open the ZIP directly, then double click the CHM inside the ZIP itself.

When you do that, Explorer will decompress the CHM file to your temp folder and then open THAT file with the CHM viewer. Because that CHM file is located on your local harddrive, the restrictions in place that prevent viewing networked CHM files, won’t take effect and, presto! CHM viewage without any registry hassles.


By the way, the 7Zip command line version is an excellent tool (with a great help file<g>) for doing just this sort of thing, if you happen to like command line tools.

Grab it here.

Merry Christmas

1
Filed under Rants

It’s been a long year.

Merry Christmas to everyone.

Here’s to next year.